
As you move from writing small Rust programs to building larger, real-world applications, your code will naturally grow in size and complexity. Managing that complexity requires breaking your package into smaller, well-organized parts. That’s where Rust’s module system comes in. It lets you group related code into modules, often spread across multiple files and folders, making your codebase more readable, maintainable, and scalable.
Beyond organizing a single package, modular design also helps you identify functionality that could be reused across packages. Code that serves a general-purpose, such as utilities, domain logic, or common data types—can be extracted into a shared library. This library follows the same principles but requires additional thought about visibility, reusability, and API design.
In this post, we’ll explore how Rust’s module system works and how you can use it effectively to organize and scale your packages. Whether you’re structuring a single binary crate, multiple binary crates, or building reusable libraries, understanding modules is essential for writing clean and maintainable Rust code.
Here’s what we’ll cover:
- Packages, Binary and Library Crates
- Modules, Sub-modules, and Workspaces
- Encapsulation and Scope
- Absolute and Relative Paths
- Visibility: Public vs. Private
- Using External Packages
- Nested Paths and the Glob Operator (*)
Packages, Binary Crates and Library Crates
When you execute cargo new my_work you create a Rust package. A Rust package is a bundle of Rust code that is managed by Cargo.
The package contains a Cargo.toml file. Cargo.toml is the configuration file that tells Cargo everything it needs to know about your Rust package. It defines the package name, version, dependencies, and other settings that Cargo uses to build and manage your code.
The package can include one or more crates. A crate is the smallest unit of code that the compiler considers at a time.
There are two types of crates: binary crates (executables that run like programs) and library crates (which provide reusable code). A Rust package can contain one or more binary targets and it can optionally contain a single library crate.
When you’re organizing code into modules, you’re working inside a crate — and that crate lives in a package.
Binary targets must have a fn main(), the entry point when the binary target executable is run.
Library crates don’t have a fn main(), and they don’t compile into an executable.
You might create a Rust package that only has a library crate and no binary crates. Such a package is intended to be used as a dependency by other Rust packages, not run on its own.
Why Multiple Binary Crates?
A Rust package can contain multiple binary targets by placing .rs files inside a src/bin/ directory. The main binary for the package lives in src/main.rs, and is the default binary executed by cargo run.
Each .rs file inside src/bin/ defines a separate binary target, not a separate crate — they share the same package and dependencies. These additional files compile into standalone executables, each with its own fn main().
So while it may look like you have “multiple binary crates,” you’re actually creating multiple binary targets within the same crate and package.
Imagine you’re building your own mini operating system in Rust as a way to level up your skills. You decide to mimic Linux and implement your own versions of common commands like cp (copy), mv (move), and ls (list).
In this case, you could create separate binary crates for each command by placing these files in a src/bin directory (you’ll need to create this directory yourself):
src/bin/
├── cp.rs
├── mv.rs
└── ls.rs
Each of these files is an independent binary and must include a fn main() — the entry point of a Rust program.
To run one of these binary crates, you use the --bin flag with cargo run:
cargo run --bin cp
cargo run --bin mv
cargo run --bin ls
This is a great example of how multiple binary crates can live side by side in a single Rust package. It keeps related tools together in one codebase while letting each tool compile and run independently.
Our Practical Scenario
We’ll learn about the Rust module system with a practical scenario. Imagine a company Ferris Computers that manufactures and sells computers. The company has three main areas of operation:
- office – purchases components, takes orders for computers, processes payment, etc.
- factory – receives shipments of components, builds computers, ships them to the warehouse
- warehouse – receives computers from factory, receives orders from office, ships computers to customers
Each of these operations has departments:
- office
- purchasing (orders components for factory)
- sales (receives orders online)
- billing (processes payments)
- factory
- receiving (manages incoming components)
- manufacturing (builds various computers)
- shipping (transfers computers to warehouse)
- warehouse
- receiving (manages incoming computers from factory)
- fulfillment (receives and fulfills orders from office)
Each of these corporate operations must communicate with each other to fulfill their mission for the company. Our job is to design a system in Rust offering functionality allowing each operation to achieve their mission.
As we develop this system, we need to ensure the system is modular so our codebase is readable, maintainable, and scalable.
Getting Started with the ferris_office Binary Crate
Eventually we’ll have a complete workspace, with multiple binary crates and a library crate, but rather than throw you into building this more complex system, we’ll start simple with a single binary crate and then show how we can move code into modules and submodules. Then we can progress toward the workspace by moving code into separate binary crates, and creating a library crate for common functionality.
Open a shell window (Terminal on Mac/Linux, Command Prompt or PowerShell on Windows). Then navigate to the directory where you store Rust packages for this blog series, and run the following command:
cargo new ferris_officeNext, change into the newly created ferris_office directory and open it in VS Code (or your favorite IDE).
Note: Using VS Code is highly recommended for following along with this blog series. Be sure to install the Rust Analyzer extension — it offers powerful features like code completion, inline type hints, and quick fixes.
Also, make sure you’re opening the ferris_office directory itself in VS Code. If you open a parent folder instead, the Rust Analyzer extension might not work properly — or at all.
Execute cargo run and verify you get this default output in the shell window:
Hello, world!Now, open the file src/main.rs and replace its contents entirely with the following code.
fn main() {
    let item1 = Item {
        item_number: "ITM-001".to_string(),
        name: "Ferris PC".to_string(),
        price: 899.99,
    };

    let order = Order {
        order_number: "ORD-001".to_string(),
        items: vec![item1],
    };

    println!("Order created:\n{:#?}", order);
}

#[derive(Debug, Clone)]
struct Item {
    item_number: String,
    name: String,
    price: f32,
}

#[derive(Debug, Clone)]
struct Order {
    order_number: String,
    items: Vec<Item>,
}
Execute cargo run and you should see this output:
Order created:
Order {
    order_number: "ORD-001",
    items: [
        Item {
            item_number: "ITM-001",
            name: "Ferris PC",
            price: 899.99,
        },
    ],
}
We’ve defined two structs for Item and Order. The Item struct represents computer Ferris Computers will sell. It has fields for the item_number, the computer name, and the price. The Order struct represents a customer order. It has fields for order_number, and items in the order, a collection of Item struct instances (Vec<Item>).
In the main() function we create an Item instance and use it to create an Order instance, then we print the order. Note that both the Item and Order structs derive Debug so we can print them out using the {:#?} pretty print format placeholder:
#[derive(Debug, Clone)]We also derive Clone as we’ll need it later to make copies of Item and Order.
If you need to refresh your understanding of Rust structs, you may find this ByteMagma blog post useful: Structs in Rust: Modeling Real-World Data.
Moving Item and Order into Modules
As our factory and warehouse likely also need to reference items and orders, lets move the Item and Order structs into modules. Create two files inside the src directory, item.rs and order.rs. Then put this code in those files and update main.rs.
src/item.rs
#[derive(Debug, Clone)]
pub struct Item {
    pub item_number: String,
    pub name: String,
    pub price: f32,
}
src/order.rs
use crate::item::Item;

#[derive(Debug, Clone)]
pub struct Order {
    pub order_number: String,
    pub items: Vec<Item>,
}
src/main.rs
mod item;
mod order;

use item::Item;
use order::Order;

fn main() {
    let item1 = Item {
        item_number: "ITM-001".to_string(),
        name: "Ferris PC".to_string(),
        price: 899.99,
    };

    let order = Order {
        order_number: "ORD-001".to_string(),
        items: vec![item1],
    };

    println!("Order created:\n{:#?}", order);
}
These lines in main.rs declare modules by telling the compiler “please load the code in item.rs and order.rs and treat each as a module”:
mod item;
mod order;
But — that only declares the modules. It doesn’t bring anything into scope yet.
These lines bring specific things from those modules into the current scope, so you can use them without prefixing them:
use item::Item;
use order::Order;
Without use, you would need to do this instead:
let item1 = item::Item {
    item_number: "ITM-001".to_string(),
    name: "Ferris PC".to_string(),
    price: 899.99,
};

let order = order::Order {
    order_number: "ORD-001".to_string(),
    items: vec![item1],
};
So the use keyword results in more concise code, by simplifying how we refer to code located in modules.
Also notice how order.rs has a line with use so the order module can access code from the item module.
use crate::item::Item;

#[derive(Debug, Clone)]
pub struct Order {
    pub order_number: String,
    pub items: Vec<Item>,
}
With these changes you’ve been introduced to two important concepts:
- creating Rust modules
- the
usekeyword to “bring code from modules into the current scope“
Exploring Visibility – Public and Private
Notice in our item and order modules we use the pub keyword to make the structs and their fields public, visible to other code:
pub struct Item {
    pub item_number: String,
    pub name: String,
    pub price: f32,
}

pub struct Order {
    pub order_number: String,
    pub items: Vec<Item>,
}
In Rust everything is private by default. Notice that we need the pub keyword on the struct and on each of its fields.
If you made the struct public and not its fields the struct would be useless, and you would get compilation errors. If you made the struct fields public but not the struct itself you would also get compilation errors, and you wouldn’t be able to access those public fields anyway because the struct would be private.
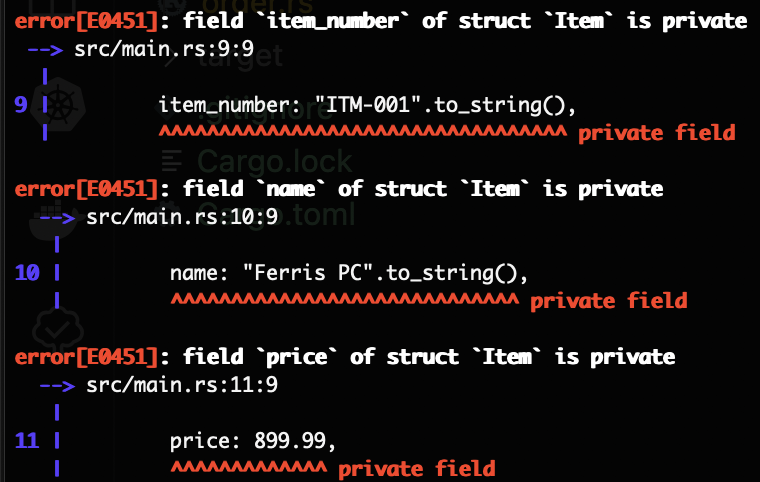
Let’s try a few things to understand this better. In item.rs, remove the pub keyword from the two struct fields. Keep the pub keyword on the struct itself:
#[derive(Debug, Clone)]
pub struct Item {
    item_number: String,
    name: String,
    price: f32,
}
Execute cargo run and you should get these errors:
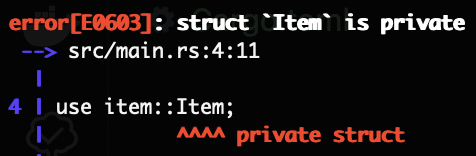
Now restore the pub keyword on the fields but remove it from the Item struct, and execute cargo run again:
Rust Paths
You may have wondered why we have these two syntaxes for the use keyword:
// order.rs

use crate::item::Item;
// main.rs
use item::Item;
use order::Order;This is a great opportunity to discuss paths in Rust.
Rust uses path-based access to navigate modules:
crate::= start at the top-level of the crate (root)self::= this modulesuper::= parent module- Plain
mod_name::= relative to current scope (likeuse item::Item;inmain.rs)
order.rs is not in the root, so to access the Item struct in the item module, it needs to look up into the crate root to find the item module.
crate::item::Item is the full absolute path from the top (root) of the crate.
In main.rs, you can just say use item::Item; and use order::Order; because:
- Modules
itemandorderare declared right here inmain.rs itemandorderare siblings, somain.rshas access to both directly.
Absolute vs Relative Paths
use crate::item::Item; // absolute path (from crate root)use item::Item; // relative path (from current module)
crate:: always works, but sometimes the shorter relative path (item::) is easier if you’re in the root module (like main.rs).
We’ll learn more about Rust module paths later in this post, such as super:: and self::. For now we’ll perform some refactoring to better organize our code, and in the process extend our expertise with the Rust module system.
Refactoring for Better Code Organization
Here are the goals of our refactor:
- Organize related types (e.g., Item, Order) into a models/ folder
- Introduce
mod.rsas the module glue - Use
pubuse to re-export types so your main file doesn’t get messy - Keep all of this inside your existing single crate (ferris_office) — no need for workspaces yet
This will be our folder structure when we’re done with the refactor:
ferris_office/
└── src/
    ├── main.rs
    └── models/
        ├── mod.rs
        ├── item.rs
        └── order.rs
⚠️ Note: In Rust 2024 Edition, the preferred way to define modules is shifting away from using mod.rs files.
Instead of this legacy structure:
src/
└── models/
    ├── mod.rs   <-- defines the `models` module
    ├── item.rs
    └── order.rs
You can now structure it like this:
src/
├── models.rs          <-- defines the `models` module
├── models/
│   ├── item.rs
│   └── order.rs
This newer style is simpler and removes the need for special filenames like mod.rs. Both styles still work for now, but we’ll use the classic mod.rs approach in this tutorial for clarity and compatibility with existing Rust projects.
First, create a new folder src/models and move item.rs and order.rs inside the models folder.
Now, inside the models folder create a new file mod.rs and add this code to the file:
pub mod item;
pub mod order;

pub use item::Item;
pub use order::Order;
What this does:
- Declares item and order as submodules of models
- Re-exports Item and Order so that users can write use models::Item instead of use models::item::Item
Now update main.rs replacing its current contents with this:
mod models;

use models::Item;
use models::Order;

fn main() {
    let item1 = Item {
        item_number: "ITM-001".to_string(),
        name: "Ferris PC".to_string(),
        price: 899.99,
    };

    let order = Order {
        order_number: "ORD-001".to_string(),
        items: vec![item1],
    };

    println!("Order created:\n{:#?}", order);
}
Edit order.rs to have this content:
use super::item::Item;

#[derive(Debug, Clone)]
pub struct Order {
    pub order_number: String,
    pub items: Vec<Item>,
}
Since we moved order.rs into the models/ folder, it’s now part of the models module. That means it’s no longer at the top level, so it can’t use crate::item anymore to reference Item. Instead, we use super::item to go up one level in the module hierarchy — from models::order to models, and then into models::item.
So you need to update the import to:
use super::item::Item;This says: “go up one level (super) to models, then into item.”
Understanding Module Relationships in Folders
Even though order.rs and item.rs are now in the same physical folder (models/), Rust doesn’t treat them as being at the same level in the module hierarchy unless we explicitly say so.
Here’s the key idea:
When order.rs was in src/, it could use crate::item::Item
Now that it’s in models/, it’s inside the models module
From there, it must go up one level (to models) to reach item
That’s why we write:
use super::item::Item;super:: means “go to the parent module — in this case, models — and then access item from there.”
Even though the files are in the same folder, they’re scoped relative to where they sit in the module tree, not just the file system.
Re-Exporting: How and Why
What does pub use do?
In Rust, pub use is a way to re-export a type or module — basically, it forwards something from an inner module and makes it accessible at a higher level.
Think of it as making it so users don’t have to dig deep into your module structure.
Before re-exporting, if you want to use Item in main.rs, you’d have to write:
use models::item::Item;Which works, but can get verbose as your structure grows.
With re-exporting in models/mod.rs:
pub mod item;
pub use item::Item;
Now in main.rs, you can just write:
use models::Item;You don’t need to know or care where Item is defined — models exposes it for you.
Using super:: and re-exporting might still be a bit confusing, but with practice you’ll see the value of these techniques, and you’ll master their syntax.
Scaling Up with Support Modules
We performed a code reorg and are starting to achieve code organization that is more like the real-world, making use of Rust module system best practices.
Now we’ll start adding support modules with common functionality used by multiple parts of the package.
Objectives
- Create new top-level modules inventory and utils
- See how they provide shared functionality, used by multiple parts of the app
- Introduce HashMap, random ID generators, and modular helper functions
- See how modules aren’t just for data — they can be for behavior and logic
This will be our new folder structure after we make these changes (two new files):
ferris_office/
└── src/
    ├── main.rs
    ├── models/
    │   ├── mod.rs
    │   ├── item.rs
    │   └── order.rs
    ├── inventory.rs     <-- NEW
    └── utils.rs         <-- NEW
Supporting Modules
Next, we’ll create new top-level modules for inventory tracking and utility functions. These will be shared across different parts of the system and help us keep logic clean and modular.
Specifically, we’ll add two files in src/: inventory.rs and utils.rs.
Modules like utils and inventory aren’t about “data” — they’re about shared logic used across multiple parts of the application. They help keep our code clean, DRY (Don’t Repeat Yourself), and reusable.
Encapsulation and Separation
Instead of writing all logic in main.rs, we put specialized behavior where it belongs: stock management in inventory, utility functions in utils.
When to Create Modules
If something will be used in more than one place, or if it makes your main.rs simpler — consider turning it into a separate module.
Add the rand Crate to Cargo.toml
First we need to bring an external crate into our package. We do this in the Cargo.toml file, where we add this
[dependencies]
rand = "0.8"
We haven’t discussed external crates, but crates.io is a repository for Rust crates other developers have created and shared. We’ll make use of the rand crate, used for generating random numbers, which we’ll use to generate unique item and order numbers.
Just add the above dependency add to your ferris_office/Cargo.toml file.
Although version 0.9 exists, we’ll use version 0.8 here to ensure compatibility.
Add Utility File utils.rs
Now create a new file utils.rs in the src folder, and add this code to that file:
use rand::{distributions::Alphanumeric, Rng};

pub fn generate_item_number() -> String {
    let suffix: String = rand::thread_rng()
        .sample_iter(&Alphanumeric)
        .take(5)
        .map(char::from)
        .collect();
    format!("ITM-{}", suffix)
}

pub fn generate_order_number() -> String {
    let suffix: String = rand::thread_rng()
        .sample_iter(&Alphanumeric)
        .take(5)
        .map(char::from)
        .collect();
    format!("ORD-{}", suffix)
}
Notice how the use keyword allows us to bring in several pieces of code from the rand module in one line with this syntax:
use rand::{distributions::Alphanumeric, Rng};This allows us to generate unique item and order numbers anywhere in our package where this functionality is needed. Note that in a production environment, this code might not produce 100% unique ids, but for learning here is it sufficient.
Add Stock Management Module inventory.rs
Now create new file inventory.rs in the src folder, and add this code to that file:
use std::collections::HashMap;

pub type Inventory = HashMap<String, u32>;

pub fn update_stock(inventory: &mut Inventory, item_number: &str, delta: i32) {
    let count = inventory.entry(item_number.to_string()).or_insert(0);
    if delta.is_negative() {
        let remove = delta.abs() as u32;
        *count = count.saturating_sub(remove);
    } else {
        *count += delta as u32;
    }
}

pub fn check_stock(inventory: &Inventory, item_number: &str) -> u32 {
    *inventory.get(item_number).unwrap_or(&0)
}
This code will allow us to update product inventory, and update the inventory quantity we have in stock available for sale. We can also check inventory to verify we have a product in stock, to fulfill an order.
Notice how we define a custom type Inventory which will simply be an alias for a HashMap<String, u32>, which will be used to keep track of product inventory. The String will be the item_number and the u32 will be the quantity of that Item we currently have on hand. We won’t get into the details of this code, but you might find these ByteMagma blog posts useful to understand some of the Rust concepts in these two functions:
Collections in Rust: Vectors, HashMaps, and More
Functions in Rust – The Building Blocks of Reusable Code
Ownership, Moving, and Borrowing in Rust
Update main.rs to Use utils.rs and inventory.rs
Now replace the code in main.rs with the following:
mod models;
mod inventory;
mod utils;

use models::{Item, Order};
use utils::{generate_item_number, generate_order_number};
use inventory::{update_stock, check_stock, Inventory};

fn main() {
    let mut inventory: Inventory = Inventory::new();

    let item = Item {
        item_number: generate_item_number(),
        name: "Ferris Mini PC".to_string(),
        price: 599.99,
    };

    update_stock(&mut inventory, &item.item_number, 5);
    println!("Stock: {}", check_stock(&inventory, &item.item_number));

    let order = Order {
        order_number: generate_order_number(),
        items: vec![item.clone()],
    };

    println!("Created order:\n{:#?}", order);
}
This updated code in main.rs creates an instance of our type alias Inventory for a HashMap<String, u32) that we’ll use to track our products on hand.
We then create an instance of the Item struct, setting the item_number using our utils.rs generate_item_number() function. We then call our inventory.rs update_stock() function to update our inventory variable tracking inventory for this new Item, adding quantity 5 of this item.
Then we print the number of items in stock for this item.
Finally we create an order, setting the order_number using our utils.rs function. We set the order items to be a copy of the Item instance we created earlier using the .clone() method, which creates a copy of the item. Then we print the order.
Execute cargo run to ensure the package builds successfully. You should get output similar to this:
Stock: 5
Created order:
Order {
    order_number: "ORD-qz1mO",
    items: [
        Item {
            item_number: "ITM-omGAR",
            name: "Ferris Mini PC",
            price: 599.99,
        },
    ],
}
Moving to a Multi-Crate Workspace
Now we’ll move from a single create package to a multi-crate workspace, which more closely mirrors real-world Rust architecture. Here are some things we’ll accomplish:
- Split out a library crate (
ferris_core) - Move your shared code into it
- Update
ferris_officeto depend on it via local path
Create the Workspace Folder Structure and Move/Modify Files
Right now, we have a single crate (ferris_office) that contains everything — models, utilities, inventory tracking — as internal modules.
We’re going to create a workspace to prepare for a more modular project structure, and gradually split some of this logic into a separate shared crate (ferris_core).
If your shell window working directory is ferris_office, then cd one level up so the working directory is the parent directory of ferris_office. Also you should close your IDE (integrated development environment) application because you will be moving files and folders.
In the parent directory of the ferris_office directory, create a new directory ferris_computers for our workspace. Then cd into the ferris_computers directory.
At this point the ferris_office and ferris_computers directories should be at the same level, they are both in the same parent directory.
Now move the ferris_office directory into the ferris_computers directory.
Next, execute this command to create a library crate named ferris_core. This command should be executed after you have changed the current working directory to ferris_computers (cd ferris_computers).
cargo new ferris_core --libNow update the ferris_core Cargo.toml file to have this content:
[package]
name = "ferris_core"
version = "0.1.0"
edition = "2024"

[dependencies]
rand = "0.8"
The ferris_core library needs access to the rand crate because we will move utils.rs from the ferris_office binary crate to the ferris_core library crate.
Then manually create a Cargo.toml file inside the ferris_computers directory and add this content:
[workspace]
members = [
    "ferris_office",
    "ferris_core"
]
This means our workspace has the members ferris_office (a binary crate) and ferris_core (a library crate).
You can now reopen your IDE to the ferris_computers directory.
Move the following files/folders from ferris_office/src/ into ferris_core/src/:
models/utils.rsinventory.rs
You should now have this structure for the ferris_core directory:
ferris_core/
└── src/
    ├── models/
    │   ├── item.rs
    │   ├── mod.rs
    │   └── order.rs
    ├── inventory.rs
    ├── lib.rs
    └── utils.rs
Note that depending on the IDE you are using, the order of the files and directories may differ.
Now replace the default new library content in lib.rs with this code:
pub mod models;
pub mod utils;
pub mod inventory;

pub use models::{Item, Order};
pub use utils::{generate_item_number, generate_order_number};
pub use inventory::{update_stock, check_stock};
In this code we create modules models, utils, and inventory, and bring them in into the library crate.
Now update ferris_office.toml to have this content:
[package]
name = "ferris_office"
version = "0.1.0"
edition = "2024"

[dependencies]
ferris_core = { path = "../ferris_core" }
This adds ferris_core library crate as a dependency of the ferris_office binary crate. We also remove the rand dependency as it is now a dependency of the ferris_core library crate.
Build the Workspace and Run the ferris_office Binary Crate
We’ve moved things around as we created our workspace, and have made a lot of changes. Ensure you’re in the ferris_computers directory and execute these commands:
cargo build

cargo run -p ferris_office
First we build all crates in the workspace, then we run the ferris_office binary crate. You should get this output on running the ferris_office crate:
Stock: 5
Created order:
Order {
    order_number: "ORD-wM21s",
    items: [
        Item {
            item_number: "ITM-F9UbA",
            name: "Ferris Mini PC",
            price: 599.99,
        },
    ],
}
If you get compilation errors or do not see the above output, check all the code we’ve built in this post so far. I know that is difficult as we made changes along the way, but in the end this comprehensive example workspace will give you a good idea of using the Rust modules system.
Add the ferris_factory and ferris_warehouse Crates
Our workspace is not done yet, we now need to add the ferris_factory and ferris_warehouse binary crates.
Execute these two commands in the ferris_computers directory:
cargo new ferris_factory --bin
cargo new ferris_warehouse --bin
These commands create two new binary crates in our workspace.
The ferris_computers workspace Cargo.toml file should now have this content:
[workspace]
members = [
    "ferris_core",
    "ferris_office",
    "ferris_factory",
    "ferris_warehouse"
]
Note, when you executed the two commands to create the two new binary crates, the workspace Cargo.toml file should have been updated automatically. If not then manually ensure it has the above contents.
Update the Cargo.toml files for the ferris_factory and ferris_warehouse crates to have this dependencies section:
[dependencies]
ferris_core = { path = "../ferris_core" }
This ensures that those two binary crates will have access to the ferris_core library crate.
Implementing One Complete Workflow
This is already a massive post, but we should add code so at least one somewhat complete workflow is simulated.
Let’s wrap this blog post with a minimal, clear, and satisfying end-to-end simulation that:
- Connects all three operations (office → factory → warehouse)
- Demonstrates crate/module communication
- Feels real but stays simple
- Runs entirely from
ferris_office(like a coordinator or driver)
Add File workflow.rs
Create a workflow.rs file inside the ferris_core/src directory, and add the following code to the file:
use crate::{Item, Order};

pub fn place_order() -> Order {
    let item = Item {
        item_number: crate::generate_item_number(),
        name: "Ferris Developer Laptop".to_string(),
        price: 1499.99,
    };

    println!("🧾 Office placed order for item: {:?}", item);

    Order {
        order_number: crate::generate_order_number(),
        items: vec![item],
    }
}

pub fn build_item(order: &Order) -> Item {
    let item = order.items[0].clone(); // Assume 1 item for now
    println!("Factory built item: {:?}", item);
    item
}

pub fn receive_item_at_warehouse(item: &Item) {
    println!(
        "Warehouse received item: {} ({}) — ready for fulfillment.",
        item.name, item.item_number
    );
}

pub fn ship_to_customer(order: &Order) {
    println!(
        "Warehouse shipped order {} to customer!",
        order.order_number
    );
}
Now update lib.rs so it has this content:
pub mod models;
pub mod utils;
pub mod inventory;
pub mod workflow;

pub use models::{Item, Order};
pub use utils::{generate_item_number, generate_order_number};
pub use inventory::{update_stock, check_stock};
pub use workflow::{place_order, build_item, receive_item_at_warehouse, ship_to_customer};
We’re just adding a line to create the workflow module.
Now replace the contents of the ferris_office main.rs file with this code:
use ferris_core::workflow::{place_order, build_item, receive_item_at_warehouse, ship_to_customer};

fn main() {
    println!("=== Ferris Computers Order Fulfillment Simulation ===");

    let order = place_order();
    let item = build_item(&order);
    receive_item_at_warehouse(&item);
    ship_to_customer(&order);

    println!("✅ Simulation complete!");
}
Finally run the ferris_office binary with this command:
cargo run -p ferris_officeYou should see this output:
=== Ferris Computers Order Fulfillment Simulation ===
🧾 Office placed order for item: Item { item_number: "ITM-nA47L", name: "Ferris Developer Laptop", price: 1499.99 }
🏭 Factory built item: Item { item_number: "ITM-nA47L", name: "Ferris Developer Laptop", price: 1499.99 }
📦 Warehouse received item: Ferris Developer Laptop (ITM-nA47L) — ready for fulfillment.
🚚 Warehouse shipped order ORD-T1Iwc to customer!
✅ Simulation complete!
Wrap Up
Wow, this is a really long post. But it presents the Rust module system in great detail using a somewhat real-world example. We started out simple, with a single binary crate, added to it, then created a Rust workspace and moved/modified code, also creating a library crate. Then we added additional binary creates and code for a minimal complete workflow.
If you’ve been following along and carefully entering the code, perhaps doing a cargo build along the way, then you should have no compilation errors and you should have the output seen in this post. Note that at times when we are. moving/modifying code cargo build might give compilation errors but that is expected.
Eventually we’ll try to get the final code up on github, but for now I hope this introduction to the Rust module system was helpful. Thanks for including us in your Rust mastery journey!
Leave a Reply